

🇺🇸 English below
Qu’est-ce que le protocole WSPR ?
Le WSPR (Weak Signal Propagation Reporter) est un protocole numérique utilisé par les radioamateurs pour tester la propagation des ondes radio avec des signaux extrêmement faibles.
Créé par le lauréat du prix Nobel Joe Taylor (indicatif K1JT), il permet d’émettre des messages très courts (indicatif, locator, puissance) à très basse puissance, parfois moins d’un watt.
Ces signaux sont reçus partout dans le monde et les données sont automatiquement partagées sur le site WSPRnet, ce qui permet de visualiser les conditions de propagation en temps réel.
En résumé :
👉 Un outil pour voir jusqu’où porte un signal radio très faible.
Une vidéo explicative : https://www.youtube.com/watch?v=dh3yKgOiXkw
La page wikipédia (en anglais) : https://en.wikipedia.org/wiki/WSPR_(amateur_radio_software)
Quel matériel utiliser ?
J’ai utilisé un émetteur SI5351 WSPR à 35€ environ ici : https://fr.banggood.com/SI5351-WSPR-Transmitter-with-TCXO-and-GPS-for-Stable-Frequency-Sync-Auto-QTH-Locator-23dBm-Output-p-2043151.html
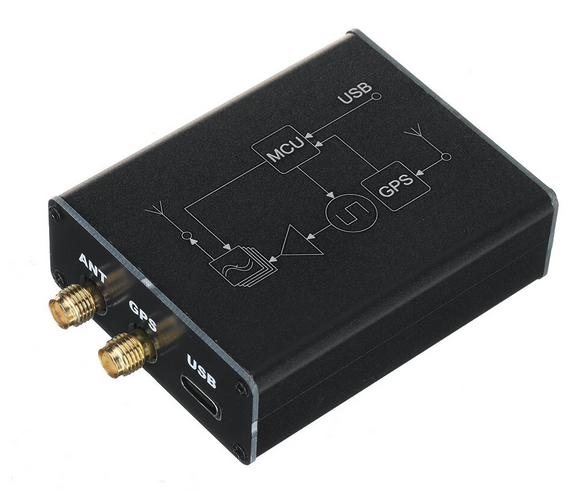
Et j’ai connecté une antenne FALCON OUTBACK 2000 ajustée sur la bande des 20m pour les premiers tests.
Branchements
PC ⇒ SI5351 ⇒ Antenne
Ici le PC fait office d’alimentation et de terminal de configuration, mais par la suite une simple alimentation USB-C suffit, car l’émetteur est autonome.
Configuration de l’émetteur SI5351 WSPR
Il faut ouvrir un terminal sur le port COM (virtuel USB) à 9600bps. Vous pouvez utiliser PuTTY, Termux ou un terminal utilisable dans un navigateur basé sur Chromium comme celui indiqué dans la documentation : https://www.serialterminal.com/index.html
Vous obtiendrez alors :
Serial  Port opened
WSPR Beacon V1.06 by BG6JJI
CFG:F4XXX JN33 23 14097100
                          INPUT:CONFIG:CALL,GRID,PWR,FREQ
La documentation officielle : https://f4mou.fr/wp-content/uploads/2026/02/wsprbeacon_SI5351.pdf
La configuration se fait en entrant une ligne comme suit (exemple sur la bande des 20m) :
CONFIG:F4XXX, ,23,14097100À noter qu’il y a 4 espaces entre les 2 virgules.
Ensuite, une fois la position GPS acquise (LED GPS allumée), l’émetteur commence à envoyer les données WSPR (LED TX rouge) :
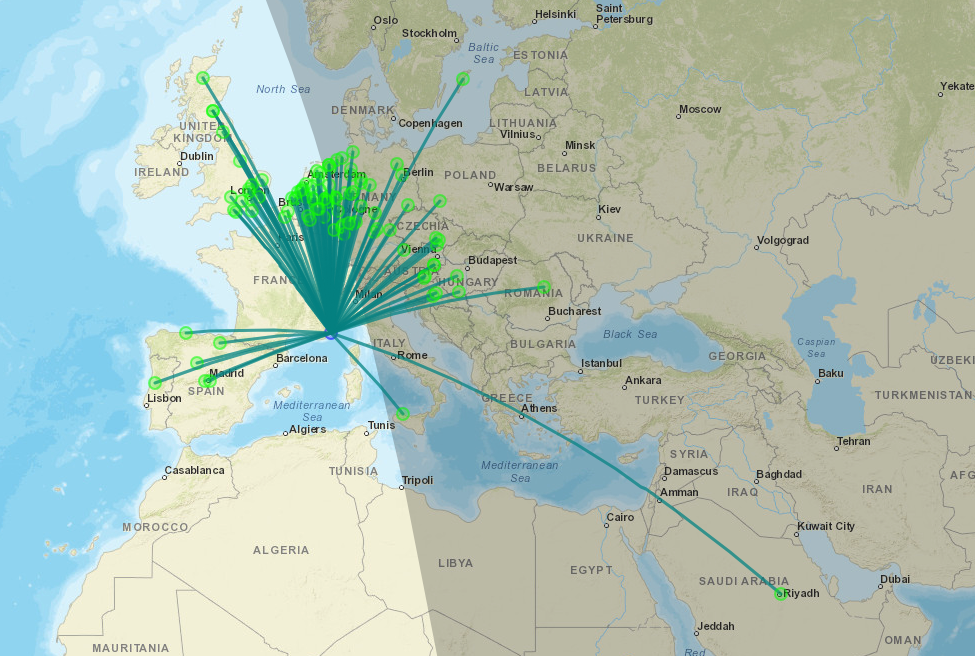
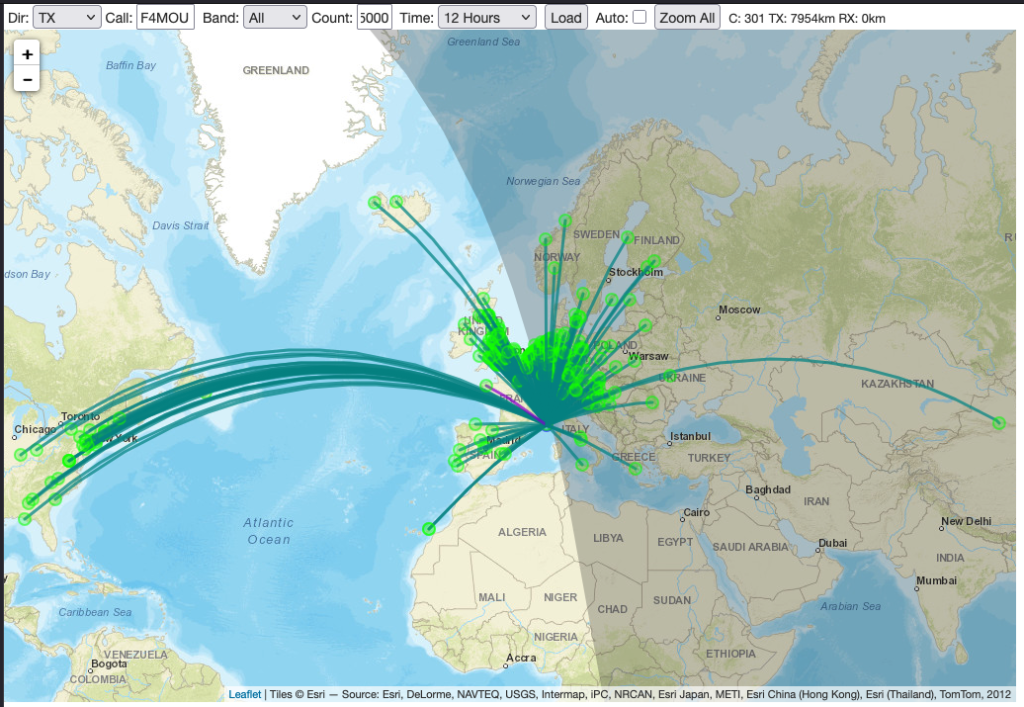
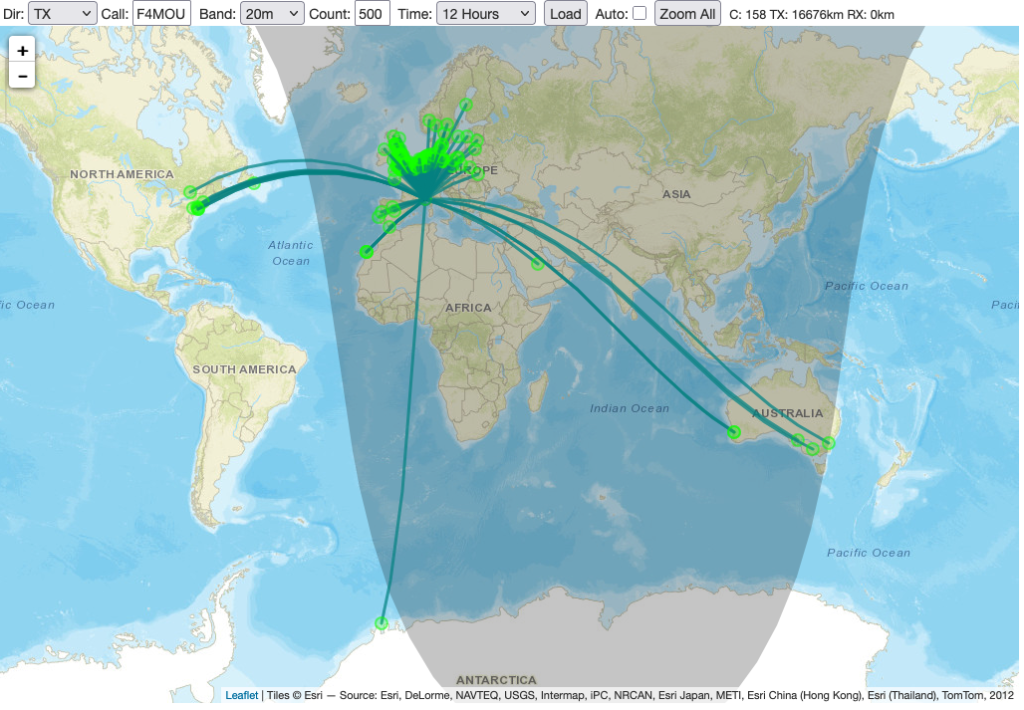
TX:F4XXX JN33 23 14097100 DONEComment voir jusqu’où l’antenne porte ?
Il y a plusieurs sites pour ça :
https://www.wsprnet.org/drupal/wsprnet/map
https://wspr.aprsinfo.com/ ⇐ le plus complet
https://balloons.browxy.com/dx?
et d’autres…
What is the WSPR protocol?
WSPR (Weak Signal Propagation Reporter) is a digital protocol used by amateur radio operators to test radio wave propagation with extremely weak signals.
Created by Nobel Prize winner Joe Taylor (call sign K1JT), it allows very short messages (call sign, locator, power) to be transmitted at very low power, sometimes less than one watt.
These signals are received all over the world and the data is automatically shared on the WSPRnet website, allowing propagation conditions to be viewed in real time.
In summary:
👉 A tool for seeing how far a very weak radio signal can travel.
Wikipedia page : https://en.wikipedia.org/wiki/WSPR_(amateur_radio_software)
What equipment should I use?
I used an SI5351 WSPR transmitter costing around €35, available here: https://fr.banggood.com/SI5351-WSPR-Transmitter-with-TCXO-and-GPS-for-Stable-Frequency-Sync-Auto-QTH-Locator-23dBm-Output-p-2043151.html

And I connected a FALCON OUTBACK 2000 antenna tuned to the 20m band.
Connections
PC ⇒ SI5351 ⇒ Antenna
Here, the PC acts as a power supply and configuration terminal, but subsequently, a simple USB-C power supply is sufficient, as the transmitter is self-contained.
Configuring the SI5351 WSPR transmitter
You need to open a terminal on the COM port (virtual USB) at 9600bps. You can use PuTTY, Termux, or a terminal that can be used in a Chromium-based browser, such as the one indicated in the documentation: https://www.serialterminal.com/index.html
You will then obtain:
Serial  Port opened
WSPR Beacon V1.06 by BG6JJI
CFG:F4XXX JN33 23 14097100
                          INPUT:CONFIG:CALL,GRID,PWR,FREQ
Official documentation : https://f4mou.fr/wp-content/uploads/2026/02/wsprbeacon_SI5351.pdf
The configuration is done by entering a line as follows:
CONFIG:F4XXX, ,23,14097100Note that there are 4 spaces between the 2 commas.
Then, once the GPS position has been acquired (GPS LED lit), the transmitter begins sending WSPR data (red TX LED):
TX:F4XXX JN33 23 14097100 DONEHow can I see how far the antenna reaches?
There are several websites for this:
https://www.wsprnet.org/drupal/wsprnet/map
https://wspr.aprsinfo.com/
https://balloons.browxy.com/dx?
and others…

Update : with my CG-3000 and a long wire :
Update 2 : with a vertical HyGain 14AVQ antenna on 20m band :
Bonjour,
Une idée de la consommation de cette balise ?
Par avance, merci.
Bonjour,
Avec un câble USB-C qui affiche la puissance consommée : 1W
Merci beaucoup pour ces informations. Faut il prévoir un filtre passe bande ?
73 F8GHE chris
Non, je ne pense pas, ça fonctionne très bien sans.
73
Jérôme
Petite info, avant de pouvoir modifier la configuration, il faut que le GPS ait fait le “fix”, sinon la configuration ne prends pas.
les 4 espaces, c’est pour indiquer de se baser sur le GPS pour donner les 4 premiers caractères du locator.
Je n’ai pas eu le temps de jouer beaucoup avec le petit module ( sur 40m et 50 mW antenne boucle de 83m : 1100 Km), le circuit CH340n a fumé. J’attends le remplacement.
J’avais eu le temps de mettre le firmware à jour, c’est extrêmement facile :
https://docs.eletoy.cc/news/2026-02-01-3 ( site officiel)
73 Jean-Philippe F5GKW
Oui tant que la position GPS n’est pas acquise le module redémarre en boucle.
Oui.
Nouveau firm et nouvel outil de flashage et configuration :
https://docs.eletoy.cc/news/2026-02-01-3